Thursday, April 10, 2008

Embrace Life


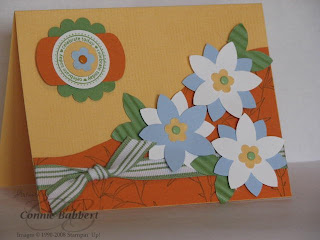
My girlfriend, Mary and I did a couple challenges today. One used Beate's inspiration dress she found from J C Crew. The challenge was to use the colors or the pattern as inspired by the dress. Here is my take on it.

The simplicity of the dress and design made it much harder than I anticipated! I usually like to finish the challenges with Mary within 30-45 minutes. This one I ripped apart after 45 minutes and went a different direction! It just didn't come together easily. I do think my finished result has the nice clean lines like the dress...what do you think? Colors I used are Pumpkin Pie, Wild Wasabi, Bashful Blue, Whisper White and Apricot Appeal. I did use the Twill background on the top...it is just hard to see.

After showing you my studio yesterday, I did some rearranging. I went back to The Container Store and purchased some additional baskets for my ribbon. And, I found this great little cart for my punches to sit in next to my working desk! I'll take some pictures tomorrow after I get it put back together.
Several of you have asked for directions on making the little Tart & Tangy treat pouches. Here is the website I used: Pouch

Have a great evening. We are supposed to get thunderstorms tonight...but the last few days have really felt like spring. The trees are starting to bud out. However...that dreaded word "SNOW" is in the forecast for the weekend! Yuck!

Tuesday, April 8, 2008

My Stamp Studio


I've been promising several people that I share my stamping space! My husband built the wood shelves for me after Christmas. I pretty much have them filled with retired stamps the way I want. Still need to label the shelves according to how they are sorted. Lots of room to still add to them. One area I want to work on is the wire shelves on the opposite wall...I may put in some cabinets along that side. My work area is pretty clean in this picture...trust me, it doesn't look like this often! The black holders by my work area are tilt-down bins...I store a lot of my little things in them...sponge daubers, sanding blocks, adhesive, pop-dots, etc. I have all my paper, both 8 1/2 x 11 and 12x12 on paper racks, labeled with the color names.

My back wall holds a grid system (from The Container Store...love it!) and wire baskets filled with ribbon spools. I am running out of space, so will probably add another grid panel and more wire baskets. I love ribbon and have some of it hid away! lol! Behind one of the double doors where you enter, I have the small wood shelves (from Ikea) that hold my individual stamps.

The tables are in the center. I have set ups for 10 all the time, but can bring in another 7' foot table for more space. I also have a game table outside the double doors of this room that holds another 4-6 people when needed.

Hope you've enjoyed the peek into my Studio. Sorry the pictures are so wonky...Blogspot just doesn't like to line them up well!


Monday, April 7, 2008

Tart & Tangy favors


Oh my! Spring has made it to Central Ohio! The trees have started budding, the daffodils at the front of our subdivision are getting ready to BUST out and bloom! I'll have to make sure to take pictures this year...there are so many and they are gorgeous! Temps today were in the low 70s and tomorrow is supposed to be nice, too. Then we are in for some rain and cooler temps again thru the weekend. At least we've had a hint!

I made these favors for my Tart & Tangy Stamp Camp participants last weekend . They were a HIT! They are fairly small, I started with a 6x6 size sheet of Summer Picnic Designer Paper and then folded them into the pocket shape. I filled the small cello pages with Starburst fruit chews, tied them with our wonderful Striped Ribbon and they pretty much followed the same fruit flavors as the stamp set (cherry, orange, lemon)! Fun! My group had a fun time doing our projects, too. Don't want to show them yet...I still have another Camp scheduled at the end of this month doing the same projects! I love this paper and the bright colors you use with the Tart & Tangy stamp set. It really lifts my spirits. The circle punches and Scallop punch are just a PERFECT fit, too. (Stampin' Up! is finally getting caught up with the backorders on these...the last of mine just went out today!)

Come back tomorrow! I finally took some pictures of my Stamp Studio and the new shelving my hubby made me for Christmas! Hopefully they will give you some ideas for organizing your space.

Sunday, April 6, 2008

Classic Backgrounds MVP


I had fun making this scrapbook page...pictures of my son, Ross, playing in the All-Star game his senior year of high school. His team went undefeated and (not to brag too much), he had one of his best games EVER! A grand slam! Of course, like most boys when around their friends, he didn't want me to take his picture...I surprised him with this shot, so it isn't the best lighting...but beggars can't be choosy!

This is one of the 12x12 scrapbook pages I did for Display Maker using the Classic Backgrounds stamp set. Funny, the minute I saw the set, these pictures and scrapbook page come to my mind. I cut the baseball round shape with my Coluzzle and hand pierced and drew the stitches. I made the spiral punch go down the side, and then the row of pierced faux stitching. I stamped the small stars background stamp in the corners, then cut out each of the red larger stars (I wasn't given the punch to use...bummer!) The alphabets are Well-Worn Alphabet and Schoolbook Serif Alphabet.

I don't do a lot of scrapbooking (cards and 3D items give me instant gratification)...but I do like it when a page comes together!

Enjoy the rest of the weekend...I have a group coming in for a Stamp Camp. The weather looks like it will be gorgeous today. Bet we will see a lot of golfers on the course!

Friday, April 4, 2008

Blogger's Challenge #41


Today's Blogger's challenge was to use the layout at the top of Page 65 in the Spring/Summer catalog. I had several scraps of East Coast Prep designer paper laying on my table, so I decided to pull something together using the colors in the polka dot paper. Flowers have those colors, so I grabbed my much neglected Stitched Exotics (one of the sets I received for making displays at Leadership). I've used it very little since I made all those samples. I stamped the large flower with More Mustard and Real Red craft ink and the Versamark/Soft Sky trick...then used Iridescent Ice to glitter and emboss the flowers. The leaves were stamped in Wild Wasabi. I placed green round Rhinestone brads in the center of each flower and popped them up with dimensionals. Added a greeting from Full of Life in the mini catalog in Basic Black, the DSP semi circle cut with the Coluzzle and the 5/8 Red Grosgrain ribbon. Voila!

Exciting night around here last night...the Ohio State Buckeyes won the NIT Basketball Tournament! Woohoo! Go BUCKS!!!

Have a wonderful day!

Wednesday, April 2, 2008

Essence of Love


This stamp set in the new Occasions mini caught my eye from the very first. Very unusual and unlike my normal style. I've really seen some striking cards, so I'm glad I gave in to the temptation to purchase it! This card is one of the challenges I completed with my friends Mary and Lisa. The challenge was to use this sketch and the colors of Blush Blossom , Groovy Guava, Wild Wasabi and So Saffron. I don't use a lot of Blush Blossom, so I was excited when Lisa mentioned this color combination!

It may be hard to see, but the small butterfly is stamped randomly over the Blush Blossom layer. The focal floral image is embossed with black. I stamped the cut-out butterfly between Happy & Birthday with Groovy Guava on Blush Blossom cardstock, then glittered it with Dazzling Diamonds. The printed paper is from Jersey Shore DSP.

American Idol results show is tonight! Again...wondering who will go. I just finished watching last night's show (since I had my Techniques Class), so now I have an idea of who I'd like to see go!

See you soon!

Tuesday, April 1, 2008

Classic Backgrounds


This was another one of the display items I made for Leadership Convention using Classic Backgrounds...a Tooth Fairy tin! I made the large star in the set into a Tooth Fairy's wand by embossing silver EP on Brushed Silver cardstock, then cut it out. I cut a sliver of Brushed Silver cardstock for the handle and tied a ribbon around it. I used the small flower background stamp with Whisper White craft over the Lovely Lilac cardstock and used the White Gel pen in the center of each flower to make them pop. I did faux stitching with the White Gel pen around the entire front of the tin. The inside looked too plain, so I used the same idea to cover the metal. The inside star is popped up with dimensionals and Wish Big was stamped on Whisper White and punched with the Word Window punch. It was a fun project to put together!

I'm waiting for my class members to get here tonight for the Technique Class. I'll be showing you a couple of the projects we made in the next couple days!

Happy stamping!