Saturday, March 31, 2007

CONGRATULATIONS!

CONGRATULATIONS
to
The Ohio State University BUCKEYES
for their win over Georgetown!
On to the BIG Championship game
on Monday!
WOOHOO!
O - H - I - O

Gift card holder


Good morning everyone! Hope you have a WONDERFUL weekend. Mine looks remarkably free, so maybe I'll get some stamping done. Of course, I do need to watch my beloved Ohio State Buckeyes perform their magic at the Final Four basketball game tonight. Go Bucks!

This gift card holder was one of my projects at my March Polka Dots & Paisley Stamp Camp. I cut the Sage Shadow paper to 5 1/2 x 8 1/2, then scored at 3" and 7". Fold up the smaller flap and stamp Happy all over. I stamped Sage Shadow off once for most of the Happys in the background, then full-strength on the final one in bottom right location. Next, I stamped the Paisley in Sage Shadow randomly over the top wider flap. I also tore off a small sliver to make the torn edge and sponged it for definition. Pull the bottom flap up and secure with two silver brads on each end (don't ask me why they look crooked in this scan...they aren't in real life!)

I inked up the flower stamp with Sage Shadow and Almost Amethyst markers and stamped on Whisper White. Then I inked up the word Joy with the AA marker and stamped. I clipped all the corners with the Tag Corner punch (love it!) and layered the white on Almost Amethyst cardstock and then punched the slot through the bottom of the layered piece. I cut a piece of Blue narrow organdy so it would go around the entire closed Sage Shadow piece. Adhere the white layered piece (only the top 3/4 to the top flap), slip the ribbon up thru the slot and tie to close. The last thing is to adhere the entire Sage Shadow piece to a 4 1/4 x 5 1/2 piece of Almost Amethyst cardstock.

Check out my Stampin' Up website calendar for the date of my April Stamp Camp! We'll be making six projects using stamps out of the Spring mini!

Set: Polka Dots & Paisley

C/S: Sage Shadow, Almost Amethyst, Whisper White

Inks: Sage Shadow, Sage Shadow and Almost Amethyst markers

Other: Blue Narrow Organdy ribbon, Silver mini brads, Slot punch, Tag Corner punch, Sponge


Friday, March 30, 2007

Another Reflected Image


This is another Reflected Image card I used as a sample at my Technique Class this week. Simple but elegant. I like to show a couple different ways to use the technique at my classes. To me, this stamp is obviously a good one to use...it reminds me of sitting out at the lake enjoying the peace. Water always calms me. We've never had a rowboat like this, but I did like hanging my feet off the back of the ski boat! It is making me ready for summer!

Sets: Summer by the Sea, Cheesecloth, EFP

C/S: Gable Green, Brocade Blue, Chocolate Chip, Shimmer White

Inks: Basic Black, Chocolate Chip

Other: Watercolor crayons, AquaPainter, Round tag punch

Thursday, March 29, 2007

Artfully Asian challenge card


One of the groups I participate in had a masculine card challenge. As I mentioned earlier, it is an area that I struggle to make cards that aren't too frilly with ribbon, etc. I made this card with a hint of hardware that the guy's will like and shiny elements (the Crystal Effects on the leaves) and symmetrical lines...plus cool "guy" colors! Even though it DOES has ribbon, I think it is streamlined enough to not look at all feminine.

The technique I used is called Colored Crystal. As many of you know, I am on the Design Team for Technique Junkies and this technique was one of my assignments for the August/September 2006 issue! So...if you want to know how to do it...please check out and subscribe to www.techniquejunkies.com Pat does an awesome job coming up with great techniques for her newsletter and the price is more than reasonable to have all that information at your fingertips. The current issue is FULL of easy-to-do techniques...it came in the mail today!

The other technique used is color-blocking. Not hard...just slicing up the cardstock and rearranging it on the base card. Here are the rest of the details!

Sets: Artfully Asian, Circle of Friendship
C/S: More Mustard, Not Quite Navy, Old Olive, Whisper White
Inks: Stazon Black, Old Olive, More Mustard
Other: Crystal Effects, Bleach, Antique Copper Hodgepodge Hardware, Mustard grosgrain ribbon, Designer Tag punch, 1 1/4 circle punch, 1/2 circle punch

Enjoy! I hope to get some stamping done tomorrow. I have several projects that just need to get finished! Today I spent most of the day working on my customer newsletter. I'm getting ready to post some classes to my Stampin' Up! calendar...my April and May Stamp Camps, a new Technique Class, and a fun Star Mini Scrapbook class! Check it out!

Wednesday, March 28, 2007

Reflected Image technique


I'm SO happy I bought this set! Of course, it wasn't one that I originally had on my list, but after seeing ALL the cute cards done with it, I just had to bump it up to the top of my list. Now I think I've purchased almost the entire Spring Mini catalog! lol!

This was one of the cards I designed for my Technique Class did on Tuesday night...the technique is Reflected Image. I thought the crab from Crab & Company was perfect to use...

Crab & Company
C/S: Cameo Coral, Ruby Red, Basic Black, Shimmer White
Ink: Basic Black
Other: Watercolor crayons, AquaPainter, French Blue grosgrain, Ticket Corner punch, Crystal Effects

Make sure to check out my Stampin' Up! calendar for future Technique classes and Stamp Camps!

Tuesday, March 27, 2007

Masculine cards


Real quick...I'm headed out of town in about an hour, but had a moment to post.

I don't know about you, but I struggle with masculine looking cards. I saw this pattern first on SCS and I tweaked the pockets to add the stitching. The card opens up on the left side like regular. The armholes, neck and bottom of the vest are all cut with punches (circle or square turned sideways). The buttons are popped with dimensionals, using the Little Pieces set. The pockets are the tag punch upside down and stitched with the paper piercing tool. Handkerchief is a punched square turned sideways, too! Background is the Jumbo Wheel Rough Texture...I thought it made it look like houndstooth! I drew a line to determine the division of the two fronts of the vest. Fun project and cute for Father's Day!

Little Pieces, Rough Texture Jumbo Wheel
C/S: Creamy Caramel, Mellow Moss
Inks: Mellow Moss cartridge, Close to Cocoa, Close to Cocoa marker
Other: Paper Piercing tool and mat, dimensionals, 1/2 circle punch, Small tag punch, 1 1/4 square punch, 1 1/4 circle punch

Monday, March 26, 2007

Guest artist - Hetty Sanders

A friend and customer of mine in The Netherlands, Hetty Sanders, sent me a couple of scans using her new stamp set, Doodle This and her new Round Tab punch. I wanted to share them with you because I loved the cheerful colors for Spring! Great job, Hetty! Glad you are enjoying your new treasures!

I'm very busy getting ready for a Technique Class and Polka Dots & Paisley Stamp Camp out of town the next couple days. You probably won't hear from me again until Thursday when I return. I'll share a couple things we made then!

Meanwhile, I'm enjoying this wonderful warm weather we are having in Ohio! Record highs today and expected tomorrow! Yeah!


Sunday, March 25, 2007

Designer Paper Color Matches

My son is still here, so I didn't get a chance to stamp yesterday...even though I have a couple of NEW stamp sets sitting here wanting to play! He is still asleep this morning, so thought I'd take a quick moment and update my Blog for you. It is promising to be a beautiful spring day here in Ohio.

I'm always trying to remember or figure out what cardstock colors coordinate with the designer papers. So, here is a list of colors that coordinate with the three types of paper in the Spring mini and also the fun Accents & Elements die-cuts. Enjoy!

SPRING MINI COORDINATING COLORS & IMAGES

Accents & Elements, Little Reminders - Certainly Celery, Pretty in Pink, Taken with Teal, Old Olive and So Saffron. (images coordinate with Office Accoutrement stamp set, and Notations Designer Series Paper)

Notations Double-Sided Designer Series Paper: Coordinate with So Saffron, Certainly Celery, Chocolate Chip, Taken with Teal, Cool Caribbean and Sahara Sand. (images coordinate with Accents & Elements Little Reminders set in the tin box and the Office Accoutrement stamp set)

Petals & Paisleys Double-Sided Designer Series Paper: Coordinate with Certainly Celery, Rose Red, Old Olive, Pretty in Pink, Taken with Teal, and So Saffron. (images coordinate with Polka Dots & Paisley and Polka Dots & Petals stamp sets, plus the Petals jumbo wheel)

Au Chocolat Double-Sided Designer Series Paper: Coordinate with Very Vanilla and Chocolate Chip.(images sort of stand alone on this one, making them a good choice for lots of stamp sets)

Friday, March 23, 2007

Tri-fold Polka Dots & Petals


Sorry, I'm posting so late tonight. My eldest son is in town for the weekend and we've been visiting. I've also been working on his taxes! Joy! But, they are done and I can move on to better things! lol! Depending on what we decide to do this weekend, I may not post again until Monday. If not, have a great weekend!

I've enjoyed making these tri-fold cards...I've made 3 or 4 different versions and sizes! This is one my Stamp Club did at the beginning of the month. Another one I did was a mock-up for the son of a friend's wedding...very elegant in a full-sheet size!

This one uses several Spring Mini sets. With the Petals jumbo wheel, White Craft on Pixie Pink is so striking! I wheeled across the entire back of the Pixie Pink, and only across the bottom of the front. Then my favorite word set, That's Nice, done again with markers in different colors. I changed up the front opening by using the small and large oval punches. The slit punch (under the button), holds the tri-fold closed.

Sets: Petals Jumbo Wheel, Polka Dots & Petals, That's Nice, Warm Words
C/S: Pixie Pink, Whisper White, Cool Caribbean, Certainly Celery
Inks: Basic Black, White Craft ink cartridge, Cool Caribbean, Pixie Pink, Certainly Celery (Tempting Turquoise, Certainly Celery, Pixie Pink markers)
Other: Small & Large oval punches, Spiral punch, Button, Pink gingham ribbon, Slit punch (under button)

Edited to add: I've received several requests for the measurements of my card. This one is 4 1/4 x 11, scored at 3 1/2 and 7. I can get two tri-folds from one piece of cardstock.


Remember...these can be ANY height. The wedding one I did was the full 8 1/2 x 11 size, still scored at 3 1/2 and 7.

By the way...my foot is feeling better. A friend (hi Mary Ellen!) suggested it may be Plantar Fasciitis and I've been doing the stretches that is suggested and it has helped SO much. Plus, I've been wearing supportive shoes (instead of my slippers) around the house, that has helped cushion my feet on the hardwood floors. So, I think I'll survive! lol!

Thursday, March 22, 2007

I should be....


I should be cutting paper to get ready for my Technique Class next week AND my Polka Dots & Paisley Stamp Camp. Luckily, I have the projects figured out for the Stamp Camp and I know what techniques I'll be teaching, just need to design the cards. But instead, I've been sitting at my computer visiting Blogs and catching up on the DVR with Grey's Anatomy that I missed LAST week. Oh my gosh! I can't WAIT to see tonight's episode! I just LOVE that show! lol!

Part of the reason I'm not motivated to move downstairs to my studio, is that somehow I hurt my foot! Don't know what I did, but I can barely put any pressure on it, especially if I've been off it for a while. Going downstairs is going to HURT, I know! I keep putting off calling the doctor...but if it isn't better by tomorrow I'm going to have to break down and go see him.

I'm proud of myself, too! I figured out how to make my watermark smaller and less obtrusive on my cards. Yeah!

Here is another card I designed at the stamping retreat last weekend. The pastel colors just shout SPRING to me! I've used Doodle That again, such a fun little set! And, Stampin' Up!'s thought to color in the words with different colored markers makes me just LOVE the That's Nice word set available in the Spring Mini! It makes the words POP off the card! OK...here are the details!

Sets: Doodle That, That's Nice, On the Spot background
C/S: Lavender Lace, So Saffron, Gable Green, Whisper White
Inks: Basic Black, Gable Green, and Lavender Lace, Gable Green, So Saffron markers
Other: Watercolor crayons, AquaPainter, 1 1/4 and 1 3/8 square punches, dimensionals, Spiral Punch, Apricot and Lavender grosgrain ribbon

Have a wonderful day! We have a few showers, but the weather is turning warmer! Spring is here!


Wednesday, March 21, 2007

Film at 11:00...

I liked the idea of using the new Spiral Punch to make a faux film strip! I punched a narrow piece of black on both sides, then used my Stampin' Up! square punches to make the repeated images inside. The Doodle That set works perfectly because of the size. The rest of the card came together easily. How fun! I think I'll keep this and give to my DH for our anniversary!

Doodle That, Doodle This, Warm Words
C/S: Basic Black, Whisper White, Real Red, Summer Sun
Ink: Basic Black
Other: Watercolor Crayons, AquaPainter, White gel pen, Summer Sun marker, Spiral punch, Round Tab punch, Small and large Square punches

Tuesday, March 20, 2007

Easter card


I love Stampin' Up!'s double sided papers...they feel so nice and thick! I just had to use a little of the Spring Mini Petals & Paisleys paper. I already bought two packs, so I didn't mind cutting into one...does anyone else feel that way? You want to hoard your pretty paper? I'm doing better about using it, cause I know Stampin' Up! will just come out with more pretty paper in the next mini! lol!

This card uses the Coluzzle to cut an oval, then the slit punch inside the oval to create the punched scallop mat. I made this Easter card for my mom and dad. The finished size is 5 1/2 x 5 1/2 and just looks SO spring to me! The oval is popped up with dimensionals and the Key Tag punch is popped up with more dimensionals.

Stamps: Bunny Hugs
C/S: Petals & Paisley paper, Pretty in Pink, Tempting Turquoise, So Saffron, Whisper White
Inks: Basic Brown
Watercolor Crayons, Slit punch, Key Tag punch, Oval Coluzzle, Crafter's Tool Kit (paper piercer & mat), Chocolate, Apricot and White grosgrain ribbons, Dimensionals

Monday, March 19, 2007

I'm BACK from the Stamping retreat!

Oh my gosh! SO much fun to get away for an entire weekend and do nothing but stamp, eat, stamp, stamp, stamp! I think I averaged about 3-4 hours sleep each night...my mind would just not turn off when surrounded by so much creativity. Of course, when I came home last evening, I could barely keep my eyes open enough to even talk with my husband or watch TV! He laughed at me because I kept dozing off in the middle of conversations. Oh well...I did sleep in this morning, but was woken up by the doorbell and a serviceman that wasn't supposed to be there for another 45 minutes. Yikes! Not a pretty sight I'm sure....lol!

I have LOTS to post, cause I did get LOTS done! A few hints...

1. I did 61 cards with one of Stampin' Up!'s At Home Scrappin' Kits! I'm going to be offering this as a class in April, so be looking for it on my Stampin' Up! website calendar! I still had some leftovers that I'll use in a mini scrapbook...they didn't really fit on a card.

2. I also made another 35 cards from a second Stampin' Up! Scrappin' Kit, Just Delightful, a leftover from Sell-A-Bration. I purposely left the greetings area blank so I can use them for Thank You, Thinking of You, or Birthday cards...whenever I need a quick card!

3. About a dozen designed cards...I'll be posting them over the next several days, so you'll have to check back to see them! lol! See posting below for the first one.

4. I started a Star Book for scrapping a few pictures. I used the Hostess Only Scrappin' Kit, Friends and Flowers. I'll get pictures when I finish it later this week. I will also be offering this as a class next month using one of the Scrappin' Kits in the Idea Book...probably Party Pieces! Be watching my calendar for this fun class, too! Leave me a comment if you have a suggestion on which kit I should use! The Star Book template I'm using is MUCH easier than others I've seen! I completed the base in less than an hour...now I'm working on the finishing touches!

Enough teasing...here is one of the cards I made especially for my mom for Mother's Day. It is a matchbook fold, which means the top of the card folds down behind the scallop and the ribbon is holding it closed. It is hard to see the glitter in the flower centers and along the stem or the Pretty in Pink background has the Doodle That stem stamped in Craft White randomly all over it. I liked the patchwork look using the markers on the flowers! I hope she loves it!

Doodle That, All Year Cheer III
C/S: Pretty in Pink, Whisper White, Mellow Moss, Barely Banana
Ink: Black Stazon and Craft White
Markers: Pretty in Pink, Barely Banana, Mellow Moss
Liquid Glue, Dazzling Diamonds, Crafter's Tool Kit, Pretty in Pink Eyelet, Slit punch (for scallops), Slot punch, Word Window Punch, Always Artichoke brad, Tag corner punch (on tag), Dimensionals


I used the Paper Piercing template to make the corner hole pattern. The top flower is popped up with a dimensional.

Thursday, March 15, 2007

Stamp Retreat weekend

Yeah! It is FINALLY here! I'm packed and ready to go for my extended weekend stamp retreat. About 25 of us get together twice a year and head to camp facilities (really NICE ones!) to spend the weekend doing our own thing. Some people scrapbook, some stamp, some sew...whatever craft you want to do.

It has taken me ALL morning to pack up my stuff...you'd think I was moving out! My Murano SUV is FULL. I don't know why I think I have to have it all with me...but I just might not have enough stuff to work on....lol! Yeah, right! I'll be lucky to finish half of what I brought with me. I plan on stocking up on all occassion cards, sympathy cards, birthday cards and stuff for the rest of the year. PLUS, I have my new sets all mounted and ready to be played with!

So...you won't be hearing from me until Monday! But I'll have some NEW stuff to publish! Have a great (and safe) St. Patrick's Day weekend!

GO Ohio State University Buckeyes!

Tuesday, March 13, 2007

Recipe Swap


I was recently in a Recipe Swap where the recipe needed to be included within a long tag pocket. The hostess compiled them all and hung them together with a binder ring decorated with ribbons!

I wanted to use my favorite recipe, Taco Soup, but didn't have many western or tex-mex type stamps. So, I decided to use Stampin' Up!'s trusty small and large oval punches to design my own cactus!

Cowboy Kid, Paisley background, Itty Bitty Backgrounds
C/S: Sahara Sand, Certainly Celery, Real Red, Whisper White
Inks: Sahara Sand, Craft Night of Navy, Always Artichoke marker
Access: Watercolor Crayons, Small and Large oval punches, non-SU Silver star eyelets, printed Tex-Mex words
Cactus was punched from Certainly Celery with Small and large ovals, shadowed with Always Artichoke WCC and needles drawn with Always Artichoke marker.


Taco Soup Recipe
makes approx. 10 cups

1-15 oz. can diced tomatoes
2 cans Rotel (comes in several flavors: original, mild, Mexican, hot)
1-15 oz. can corn, drained
1-15 oz. can black beans, drained
1-15 oz. can kidney beans, drained
1-15 oz. can refried beans, fat free
2 - 9.75 oz. cans of Swanson chicken, drained (I break it apart as I put it in the crockpot)
1 packet taco seasoning mix
1 packet of Hidden Valley Ranch dressing powder mix

Place all ingredients in a crockpot and simmer on LOW until soup is thoroughly heated, approx 2-3 hours. I stir the mixture several times during the process.

Serve with shredded cheese and a dollop of sour cream.

My boys love this recipe and always ask for a big batch to take home with them!

Monday, March 12, 2007

Post-it Note box


I'm always losing blank post-it note pads on my desk. I saw a note holder box that Lisa Somerville made and I adjusted the sizes so 3x3 post-it notes would fit. Works great! I no longer lose my sticky notes and it looks PRETTY sitting on my desk! Here is what I did...sorry the inside didn't scan too well.

Doodle This, Everyday Flexible Phrases stamp sets
C/S: Sahara Sand, Cranberry Crisp, Treehouse paper, Whisper White
Inks: Basic Black, Always Artichoke
Watercolor crayons, Aqua Painter, Dazzling Diamonds, Liquid Glue, Round Tag Punch

I stamped the Doodle flower 3 times with Black Stazon ink. Then, I used the WCCrayons and drew directly around the outline of the flower and leaves with the crayon in Summer Sun and Always Artichoke. Using the AquaPainter, I pulled the color into the flower petals. Then I took Bravo Burgundy crayon and just lined one edge of the petal and centers, used the AquaPainter again to pull and blend that color into the Summer Sun! I like the two-tone look! I colored two of the petals with the Always Artichoke crayon and cut them out for leaves. I highlighted the dots and center of the flower and leaves with liquid glue and sprinkled on Dazzling Diamonds. The Treehouse stripe paper is stamped with the Doodle stamp in Always Artichoke and I used the same stamp for some inside decoration. The Round Tag Punch tab acts like a neat little handle for the lid of the box. I used several Dimensionals to pop up the two layers of the flower and slightly curled the petals down.


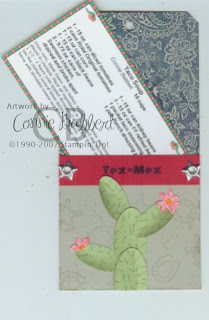
Directions for the box. I used Sahara Sand for the base and cut two pieces.

1st piece: 4 3/4" x 4 3/4", score at 3/4" around all four sides (this makes the box bottom and sides) Cut slits to score line on opposite sides of two ends, fold in tabs and adhere.

2nd piece: 8" x 3 3/4", score 3 5/8" from both ends (this the top and bottom of box)

On the bottom of the 2nd piece, adhere the box...the lid will fold down over the box. The Round Tag Punch is folded around the Sahara Sand lid.

Add 3x3 post-it notes and you are good to go!

Saturday, March 10, 2007

Stamp Club card

This is one of the cards my Stamp Club did this past week. I loved this cheery Easter card inspired by StampItForFun on SCS. The Spring Mini Petals & Paisley paper and colors makes me think spring will actually be here soon, plus the 60 degree weather we had in Ohio today helped! The multi-colored chicks remind me of the marshmallow peeps my son used to eat every Easter. Since I sold 4 Best of Cluck stamp sets, I think my Club members really liked it, too! It is one of those sets that I always passed by in the catalog. You'll notice that I cut the Thanks a Bunch away from the chicks on this stamp. I like the idea of being able to use the chicks without the words. One of the great benefits of mounting our own Stampin' Up! stamps...I could choose to do that!


Best of Cluck, Loads of Love Accessories
C/S: So Saffron, Cool Caribbean, Whisper White, Regal Rose, Petals & Paisley double-sided paper
Inks: Basic Black, Old Olive, Basic Black marker
Watercolor crayons, Aqua Painters, Rose grosgrain ribbon, 1/8, 1 1/4 and 1 3/8 circle punches


Friday, March 9, 2007

Doodle This Card Challenge


I belong to a group where we can participate in challenges every week. This challenge was to use Brown on the card. Two of my favorite colors right now are Cool Caribbean and Chocolate Chip together (as you can tell from my banner!), and I liked how watercolored Ruby Red coordinated with them. Dazzling Diamonds adds the bling to this card! I dazzled the spots on the petals, the center and the dots and swirls on the doodle! The piercing template makes such neat patterns on corners. Fun!

Doodle This
C/S: Chocolate Chip, Cool Caribbean, Whisper White
Inks: Basic Brown
Accessories: Watercolor Crayons, Paper Piercing tool and template, Cranberry stitched ribbon, Chocolate grosgrain ribbon, Dazzling Diamonds, Liquid Glue, Cutter Kit, Paper snips and dimensionals

New Banner for me!

It is DONE! Beth Silaika designed it especially for me! http://freckledfundesigns.blogspot.com/ She included directions for even a novice like me to add it to my Blog. Very exciting. Now I feel I'm really ready to start posting!