Wednesday, May 21, 2008
Stitched Exotics and Define Your Life

Wednesday, March 19, 2008
Classic Backgrounds Money Holder

This was one of the 3D items I did for Leadership Display Maker using Classic Backgrounds. It is a tri-fold money holder with a belly band that slides off. Sorry...for some reason I didn't take a picture of it open! Although hard to see the center is actually a green Rhinestone brad. I used the stamp a ma jig to get the background pattern to line up correctly. The white scallop circle I backed with a Taken with Teal scallop circle to give it a little color. I used a black marker to just highlight the words "Wonderful Friend" and then used the Word Window punch. I used Certainly Celery and Taken with Teal...I like that color combo a LOT!
It's Wednesday and about time to watch American Idol...wonder who gets voted off tonight!
Tuesday, March 11, 2008
Stitched Exotics
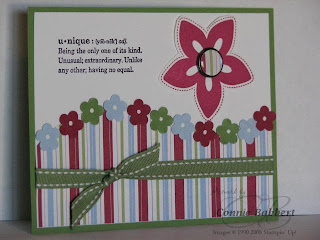
So, once again I have a sample of the Displays I made for Leadership using Stitched Exotics. This is a post-it-note box. I have another one like it sitting on my desk and love how it keeps them in one place. It is deep enough to hold both the 3x3 size and the smaller size on top. I used Heat & Stick Powder to glitter the flower and punched the leaves with the 5 petal punch from Faux Diamond Dust (Technique Junkies newsletter) cardstock. The Stripe DSP is from the retired Darling Doodles paper pack...I loved that paper and the colors! The center is a Build-a-Brad...those are so much fun to use!
Enjoy! We are digging out from our Blizzard and the snow is melting fast! Yeah!
Connie
Tuesday, March 4, 2008
Boho Backgrounds Zoo page

Thought I'd share another scrapbook page I made for the Displays at Leadership featuring the assigned set Boho Backgrounds. A couple pictures of my adorable niece and nephew visiting the zoo...aren't they cute? My brother captured their pictures hugging the cement penguins.
Along the left I used the Spiral punch on Basic Black cardstock. The medallions have a jumbo eyelet in the center, and I used the scallop punch and two Round Tab punches beneath the scallop to make a circle around it. The tree is the Origami folding pattern...it is fun to make the pattern/tree as small or large as you want, depending on the size of your paper! This was a fun page and one that came together easily. I pictured the left row of medallions on a page as soon as I saw this set.
Enjoy!
Monday, February 18, 2008
Boho Backgrounds 3

I'm sure I've mentioned it before, but when I make cards for Convention or Display, I like to focus each of the stamps on the cards or projects I'm designing. I don't know about you, but there are usually 1-2 stamps in the set that become my favorites, and I neglect the other poor little stamps in the set! Well, the argyle stamp is one that was neglected...I think I'm argyle challenged! So...for this Display sample, I pulled out my Stamp-a-ma-jig and tried to line up the argyles evenly. I think I did a pretty good job...
This card I had in my head that I wanted a masculine look and feel. On the other samples I made, I had already cut out the stars, mounted some on the Scallop Circles...so I had my large 1-3/8 circle sitting next to me (at the time ALL my punches were sitting next to me on the counter! I think I had EVERY punch pulled out to use!) I tried punching the star with the large circle and liked the effect. So...I chose some masculine colors (Wild Wasabi, Chocolate Chip and Really Rust) with Very Vanilla and pulled together this card. The "Celebrate" was from the retired All About U...now you could easily substitute Celebrate from Celebrate Everything and it would look great! The circle stars are popped up with dimensionals and an Antique Brass mini brad in the center of each. I think it turned out to be a nice, masculine card and amazingly similar to what I had imagined in my head! lol!
This week I have a busy week for deadlines, so I'm sure to get lots of stamping done. I figured out my Control Freaks swap card...now just to cut paper and stamp 40 of them and get them mailed by Friday...piece of cake, right? lol! Have a good night!
Saturday, February 16, 2008
Boho Backgrounds 5

This one I wanted the medallion to appear to be background designer paper. I used my Stamp-a-ma-jig, to evenly stamp the medallions with Night of Navy on Whisper White cardstock. After I made several rows, I cut it down to a 2" strip. Then I used the slit punch to make a scallop for the left side...punching a 1/16" hole in each scallop and adding a Pretty in Pink mini brad to each hole (my favorite part of this card!)
The navy "stripe" you see on the left is actually Navy grosgrain ribbon to hide the seam between the two separate pieces of cardstock. I stamped the medallion and punched it with the Scallop Circle punch...then behind that I punched two Round Tab punches in Pretty in Pink and layered them as a "faux" circle behind the scallop. Thanks So Much from Think Happy Thoughts is stamped with Navy and punched with the 1" punch, the center flower is stamped with Pretty in Pink and punched with the 3/4 circle punch...all the circles are layered together and then popped with dimensionals.
Had a fun class today...a couple people couldn't make it at the last minute so it was small, but hey...they received my individual attention, right? Tomorrow I'm volunteering for Stampin' Up! with Ronald McDonald House. We are converting old card front swaps into cards for the residents to use.
Have a great weekend!
Connie
Monday, February 11, 2008
Sweet Celebrations 3

These are lots of fun to make. I'll have to whip up a few more soon!
Sunday, February 10, 2008
Stitched Exotics 5

So...a quick post here...another picture of my nephew and my niece that I made for the Display samples at Leadership! This was the photo in a Christmas card my brother sent out...can you see they are dressed as angels? White turtlenecks with angel wings and tinsel halos. CUTE! He is even holding her hands.
Colors I used were Basic Grey and Soft Sky cardstock. The swirls are embossed with silver. I stamped the flower twice with Purely Pomegranate on Glossy White and cut out...I also stamped the flower with Wild Wasabi and cut out two leaves. They are popped up with dimensionals and a rhinestone brad in the center.
Have a great Sunday!
Wednesday, January 30, 2008
Classic Backgrounds 2

Stampin' smiles,
Tuesday, January 29, 2008
Stitched Exotics 4

I really liked how this card turned out. To me, the colors are ones I don't frequently use...Pretty in Pink, Old Olive and Elegant Eggplant...but my trusty Color Coach tells me they do work together! Again, it is a card I made for Display at Leadership. I had just received the background stamp, Baroque, and couldn't wait to ink it up! I used Pretty in Pink on Pretty in Pink cardstock. I thought it would be "fun" to cut out the swirl stamp pattern in Stitched Exotics...yeah right, fun! The inside of the flower I also cut out and it fit perfect with the Scallop Circle behind it. I added the Spiral Punch along the bottom. I don't use this punch enough, cause I really like the look! Then I stamped Stem Sayings and pierced a row underneath it. Love that wide 5/8 ribbon, too!
Have a great evening!
Monday, January 28, 2008
Classic Backgrounds

Both the star and the scallop circle are glittered using Iridescent Ice EP. I also placed a clear Rhinestone brad in the center of the star (from the Pretties kit). The color in this scan is off...the star actually matches the strip that Happy Birthday is stamped on...but it doesn't look like it here for some reason! Across the top of that band I did a row of paper piercing. I also used the background stamp Tres Chic on white with a base card of Lovely Lilac.
Enjoy!
Thursday, January 24, 2008
Stitched Exotics 3

I finished my Control Freak SAB swap cards! Yeah! I mailed them off to the hostess. Glad to have that "chore" off my lap. I absolutely love seeing what these gals do...the best swap cards ever! My customers love getting to see all their awesome work, too.
This was another one of the display cards I made for Leadership using Stitched Exotics. Funny story...my friend, Mary Brown (know her and her awesome work???) came over the night before Leadership and stayed since we had an early flight. She saw a similar card to this laying out on my table, glanced at it quickly, and wanted to know why I made green monkeys! lol! I guess looking at it quickly, you could see green monkeys prancing along the bottom...too funny!
Wednesday, January 23, 2008
Stitched Exotics 2

I was able to work on my big swap for Control Freaks and have it 3/4ths done. It needs to be in the mail by Friday, so I can finish it up tomorrow. There is some cutting involved, so I'll spend tonight doing that in front of the TV.
This was another display card using Stitched Exotics. It is always my goal to use every stamp in the set when I'm doing displays...that way everyone can see the versatility of the set. This large flower is my favorite in the set...just perfect to use the Jumbo eyelet in the center! In this case, I added the crystal Rhinestone from the pretties kit INSIDE the jumbo eyelet for a really cool effect! The zig zag is from All in a Row stamp set...makes a great faux stitch look! The background is Rose Red Designer Series Paper. In addition, Birthday Hugs and Wishes is one of my favorite greetings. Enjoy!
Tuesday, January 22, 2008
Stitched Exotics

I used the color combination of Blue Bayou, Groovy Guava and Sahara Sand...along with Very Vanilla and a touch of Really Rust in the center of the flower. I cut out both the large and small flowers in this set and layered them with the Pretties Kit flat pearl for the center! I used the 5 petal punch to make some leaves out of the Blue Bayou DSP and cut into two leaves. I also used the small and large oval punches for the thank you greeting. I did use the background swirl on the Groovy Guava layer beneath the flower, but it is hard to see.
Well, I'm not getting any better...in fact I'm worse today. I see a visit to the doctor in my near future...(sigh)....
Monday, January 21, 2008
Sweet Celebrations 3
Fun! Easily a card that could be used for either a boy or a girl! Again, just posting quick today...still feeling punky...
Saturday, January 19, 2008
Sweet Celebrations 2

Sorry this is so short. I've caught a cold...so I'm kind of sluggish today. Hopefully I'll feel better tomorrow!
Thursday, January 17, 2008
Sweet Celebrations Wedding

Background is simply Brushed Silver cardstock and I used the Polka Dot background stamp with Versamark and Silver EP on Whisper White cardstock. The center black 1/2" circle with the silver heart is popped up with a dimensional. I layered the Scallop Circle punch with the Round Tab punch. (Have you seen this trick? Punch two of the Round Tab punches out of the same color cardstock...I used Black. Layer and adhere them together so they make a perfect circle to fit behind the scallop circle punch!) Finally, I dressed the card up with some of the Basic Grey and white Taffeta ribbon. This card is very shimmery and elegant in person!
I'm going out of town and will return Saturday. Look for my Blogger's Challenge then...
Wednesday, January 16, 2008
Boho Backgrounds 3

Again, the Spectrum pads have been retired, but you could get the same effect using several different colored ink pads. The center Boho medallion is stamped off in Pumpkin Pie to lighten it enough so the Lovely Lilac greeting shows thru on top. This verse is my favorite out of the All Holidays set!
Lots to do today. I'm getting ready to do a couple classes out of town and visit some dear friends. I'll check in tomorrow before I leave!
Enjoy!
Tuesday, January 15, 2008
Boho Backgrounds 2

This card is actually a tri-fold card. The medallion from Boho Backgrounds and the U layer actually lift up, the stripe paper layer folds down. For some reason, I didn't take a picture of it open...duh! lol! Oh well...I think you can figure it out on your own.
The details on the medallion...I used craft Really Rust and craft Chocolate Chip to varigate the color on the stamp. I stamped on Confetti Cream and then embossed the medallion with clear embossing powder for a shiny, cool look. The center I used an Aged Copper mini brad from the Hodgepodge Kit. I punched out the medallion with the Scallop Circle punch and colored the edges with Really Rust ink. Other details include faux stitching around the top half of the card and using my Chocolate Chip marker for the "thread"
I'm off to my studio to crank out some cards and techniques for my classes this week!
Monday, January 14, 2008
Boho Backgrounds

I also met up and had dinner with several of the gals from my SSUS group. Fun to meet all of them and put real faces with names and blogs!
This was one of the Boho Background cards I made that was posted on the Leadership display boards. That set is just PERFECT for the circle and scallop punches! This one I stamped Regal Rose and Tempting Turquoise medallions and punched with the scallop punch. I stamped the medallions again and punched the centers out with the 1" circle punch...and alternated them on in the centers of the other colors. The middle one I stamped Hugs & Kisses on Whisper White and punched with the 1" circle punch. And I punched a Tempting Turquoise medallion with the 1-1/4 punch and layered it on the Regal Rose scallop circle. The centers I added interest with some colored brads. The background on the Regal Rose piece is stamped with the Paisley background stamp for depth and texture. I wrapped the white taffeta ribbon around it and shaded the edges with White Craft ink. It is a 3x6 sized card (using a 6x6 piece of cardstock and folding in half). I think unusual sized cards are fun!
Keep watching...over the next few days, I'll be posting the Display cards I made!